Truffles for dinner?!? Yes please! I don't see a problem with it! Wasn't my intentions, but it just might have happened. I was home alone and I just couldn't stop popping the one-bite wonders into my mouth! And soon enough there was no need to worry about what I was going to dream up for dinner! I was stuffed! Oops :)
I forgot to take a picture of the inside of the first couple that I ate, so I guess I just had to have another one! Clearly I ate this one just for you guys! Took one for the team!
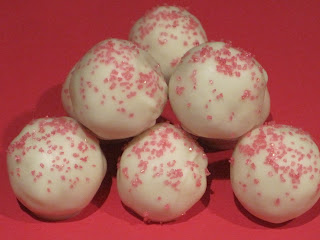
Adding a small amount of shortening to the almond bark does wonders! It thins out the almond bark just enough to aid in creating a nice smooth outer shell! Sure glad I finally figured this one out!!
Sugar Cookie Truffles
1 16 ounce package of refrigerated sugar cookie dough
3 ounces cream cheese
8 ounces almond bark
1 tablespoon shortening
sprinkles for garnish
Bake the cookies according to package directions. Cool cookies completely on wire rack.
Crumble the cookies in a food processor until the cookies are a fine crumb. Add the cream cheese and process until the mixture starts to hold together.
Roll mixture into 1" balls and place on a wax paper lined baking sheet. Chill in the refrigerator for 30 to 60 minutes.
Melt the almond bark and shortening on medium power in 30 second intervals until smooth, stirring after each interval.
Dip each ball into the almond bark with a fork, tapping off any excess. Return to the baking sheet and sprinkle with sprinkles while almond bark is still wet.
Let set and enjoy! Store in the refrigerator if you don't plan on eating immediately!
Source: Cookies and Cups
Enjoy the sweet escape!
-Jess
Thursday, January 27, 2011
Monday, January 24, 2011
Chocolate Toffee Shortbread Bars
Today I had a major urge to bake. Something. Anything. But it had to be something low maintenance. Wanted to bake, but didn't want to spend all day in the kitchen. And didn't feel like washing a whole mound of dishes. This pretty much eliminated cake or cupcakes. And left either bars or cookies. I started by browsing through my already saved recipes but nothing struck my fancy. I then started clicking through a few of my favorite blogs to see if they had posted anything new over the weekend. I opened up Annie's Eats and cha-ching, chocolate toffee shortbread bars! A recipe that was a combination of bar and cookie! A bar cookie!
A sweet and crumbly buttery base. Topped with a thin layer of melted chocolate. And sprinkled with crunchy toffee bits. I always love when Zach taste-tests my baked goods because I can always tell within the first bite if he likes it or not. If he likes it his eyes get really big and he usually says something like, "oooh yeah, this is really really good." (wish I could insert voices to these sayings!) And if he isn't crazy about it he gives a little head nod and says in a not-so convincing voice "yeah, it's good." Proud to say that these bar cookies got the big eye vote!!
Chocolate Toffee Shortbread Bars
For the shortbread base:
1½ cups all-purpose flour
½ tsp. salt
¼ tsp. ground cinnamon
2 sticks (1 cup) unsalted butter, at room temperature
½ cup brown sugar, packed
¼ cup granulated sugar
1 tsp. vanilla extract
3 oz. bittersweet or semisweet chocolate, finely chopped
For the topping
6 oz. bittersweet or semisweet chocolate, finely chopped
1½ cups toffee bits
Directions:
Preheat the oven to 375˚ F. Line a 9 x 13″ baking dish with foil and spray lightly with cooking spray. To make the shortbread, combine the flour, salt and cinnamon in a small bowl; stir to blend and set aside. In the bowl of an electric mixer, combine the butter and sugars and beat on medium-high speed until light and fluffy, about 3 minutes. Blend in the vanilla. With the mixer on low speed, beat in the dry ingredients just until incorporated. Stir in the chopped chocolate until evenly distributed.
Transfer the dough to the prepared baking dish and press into an even layer covering the bottom of the pan. Bake for 18-20 minutes, or until the shortbread is bubbling. Remove the pan from the oven and transfer to a wire rack.
Sprinkle the 6 ounces of chopped chocolate evenly over the top of the cookie base. Cover the pan with foil and let sit for 5 minutes. Remove the foil and use an offset spatula to spread the melted chocolate evenly over the crust in a thin layer. Immediately sprinkle the toffee bits over the melted chocolate and press down gently to adhere. Let the bars cool to room temperature. You may speed chilling by transferring to the refrigerator or freezer. When the topping is set, remove from the pan, transfer to a cutting board and slice into bars.
Labels:
Bars
Sunday, January 23, 2011
M-I-C-K-E-Y M-O-U-S-E
This Mickey Mouse cake was made for my nephew Luke's 2nd birthday. Luke is a big fan of Mickey. He is also a big fan of Buzz Lightyear so I'm just glad my sister went with the Mickey theme for his birthday. I can't imagine putting together a Buzz cake. Don't' get me wrong. I would've accepted that challenge.
My husband and I just got home from his birthday party. Oh it was so much fun. I just have to say that I went in full spirit with my Minnie Mouse shirt on. Luke saw his cake got the cutest little smile on his face and kept saying over and over, "Mickey cake!" while gave Mickey a little pat on the cheek. Thank goodness fondant can maintain the integrity of the cake. I wish I had a picture of him and his cake. I'm sure my sister does. Too darn cute. I asked his older brother Rhett what he wanted for his birthday thinking that he might have changed his mind, but he hasn't. He still wants a repeat of his last birthday cake... a Nemo cake which can be seen in an earlier blog post. Of course at the end of the night I turned to my sister and brother-in-law and asked what the theme is for their next son, Owen's birthday who will turn 1 in June. I just love those three little boys.
I'm so sad to say that I didn't have Jess helping me on this project. I really missed not baking and assembling with her. I really could have used her help. In the end the project turned out quite well. Someone even told my sister at the party that I should start selling them. At that time my sister informed her that I (we) do!
To make the Mickey cake I made one 10 inch cake and two 6 inch cakes. I cheated just a little and made the ears from 2 boxes of vanilla cake mixes and store bought frosting. The 10 inch cake was homemade. I used the chocolate cake recipe from the chocolate cake with PB frosting that Jess blogged about in an earlier post. This chocolate cake is so moist and delicious. The only problem is that it is so moist and delicate that it can be challenging for a novice to assemble a layer cake using this recipe. For the filling on all of the cakes I made whipped ganache and to it I added finely crushed mint oreos. I covered the chocolate cake with a really delicious chocolate frosting. I will blog about the frosting in an upcoming post. It sure was a find!
Everyone loved the taste! I got many compliments on the great moistness of the chocolate cake. While people could tell that the filling was mint they couldn't quite put their finger on what it was. The combination of the mint oreos and the whipped ganache made a really yummy filling. It certainly helped jazz up the plain boring boxed vanilla cakes.
Another Sweet Escape success.
Bake on!
-M
Safari Cupcakes
These cupcakes were for another co-workers baby shower! Beginning to think that there must be a contagious baby bug going around our unit at work. Seems like everyone either just had a baby, will be having a baby, or wants to have a baby.
Her 'lil baby Gavin should enter this world in a little over a week! I'm sure she wouldn't complain though if he came a little early. I just have to share with all of you the fun and creative way that they found out they were having a little boy. At their twenty week ultrasound they had the tech put the sex of the baby in a sealed envelope. First of all, this would be pure torture for me. I would have ripped into that envelope before I even left the doctor's office. But anyways, enough about my hatred for suspense and surprises. They then took the envelope to Queen of Cakes in Edina and asked them to make a cake with the inside of the cake being colored either pink or blue. When they cut into the cake the inside was blue and revealed they were having a BOY!! How cute is that idea?!?!
Alright, onto the cupcakes that we made for the shower!! After much debate on what boyish theme to pick, we settled on safari animals! Lions, tigers, and monkeys! Only to find out that this is also the theme of the baby room! What are the odds of that! Worked out a little too perfectly!
These were fairly easy being that pretty much all of the shapes were cut out with circle cookie cutters. The only tedious part was securing down the many layers! But once again, the end result makes the time well worth it!
Labels:
Cupcakes
Saturday, January 22, 2011
Funfetti Cupcakes from Scratch- Zach's Birthday Wish
Zach's birthday was this past Friday and of course I had to send cupcakes with him to work. Kind of felt like a mom sending a treat with her little kid to school. His coworkers sure have come to expect these delicious little treats. And have actually started to come up with any possible excuse for why I should make something to send with Zach. At least I know I have guinea pigs to try some new recipes on!
Zach's absolute favorite cake is boxed funfetti (okay, it's my favorite too!) There is just something about that cake that makes it so darn irresistible. He actually wanted funfetti for his alien cake but I refused to use a boxed cake for that one. Ever since starting this whole baking shinanigans I feel like I am cheating every time I bake something from a box. Hopefully I get over that feeling of guilt sometime soon. The convenience of a box mix comes in mighty handy at times.
So of course I pulled up good 'ol google and went on the hunt for a homemade funfetti cupcake recipe.
And this is what I found. Definitely nothing like boxed funfetti, but still very tasty. Pretty much just a plain old vanilla cupcake jazzed up a little bit of rainbow sprinkles. And I topped it off with Zach's favorite cream cheese frosting! This frosting will seriously make any cupcake taste delicious!
This recipe is from I heart Cuppycakes.
Labels:
Cupcakes
Wednesday, January 19, 2011
Decadent Peanut Butter Pie
So around Christmas time I was going through the Sunday paper and drinking my morning coffee when I came across the recipe for this pie in the coupon section of the ads of all places. Anything with the words "peanut butter" always catches my attention. At that time I was so busy doing all of my holiday cookie baking that I saved this one until now. Yeah, I have not been faithful with my blogging as of late. Sorry. I was utterly disappointed in myself when at the end of my Christmas baking I realized that I had forgotten to take pictures of my masterpieces. Grrr. Well, I have some of them so I will try to get up to date. In the meantime, lets get back to this peanut butter pie. I brought it to work today and I don't think that I could've picked a better day. There was only one tiny little sliver that was left and I think that it was only there because my coworkers were practicing "Minnesota nice" and didn't want to take the last slice just in case someone else wanted it. Well, the near empty pie tin clearly speaks for itself. If you like PB you will enjoy this treat. I bought the prepared pie crust the recipe calls for... I think if I was to make it again, I would make up my own recipe for a chocolate pie crust and make this in a 8X8 pan. When I made this dessert there was too much filling and topping and it ran over creating a nice little ooey gooey mess. I also only end up using about 2/3 of the fudge topping that it calls for. So, here is the recipe. Enjoy!
1 cup creamy peanut butter, plus 2 Tbsp, divided
1 8oz. package cream cheese, softened
1 12oz. container whipped topping, thawed
1 11.75oz jar hot fudge spoonable ice cream topping
1. Beat together 1 cup peanut butter, cream cheese and sugar in large bowel with an electric mixer on medium until well combined. Gently mix in 3 cups whipped topping until thoroughly combined. Spoon mixture into pie crust. Using a spatula, smooth mixture to edges of pie.
2. Reserve 2 tablespoons of hot fudge topping in the corner of a resealable food storage bag; set aside. Microwave remaining topping on high for 1 minute. Stir. Spread topping over pie covering entire peanut butter layer. Refrigerate until set. Spread remaining whipped topping over hot fudge layer, being careful not to mix the two layers.
3. Cut a small corner from bag containing topping. Squeeze bag to drizzle topping over pie. Place remaining 2 tablespoons peanut butter in a resealable food storage bag; cut bag corner and squeeze to drizzle in opposite direction from topping. Refrigerate until ready to serve.
I really want to have a pic here for y'all but it was eaten much too quickly. Just know that it would make your mouth water.
Bake on!
M
Labels:
Peanut Butter,
Pie
Sunday, January 16, 2011
Alien Cake
About a month ago Michele and I were talking about how her nephew wants a mickey mouse cake for his birthday at the end of January. Zach happened to be in the room during this conversation and immediately said "what kind of cake do I get for my birthday?" After a few seconds of pondering he blurted out "I want an alien cake!" And he was totally serious. He had his heart set. His only criteria was to make it cartoon-like versus sci-fi. When asked what he wanted it to look like his response was "let your creative juices flow!"
And this is what we came up with!
Clearly the birthday boy liked it! The inner kid never dies!
And this vanilla cake was phenomenal! It is a vanilla buttermilk cake from Sky High: Irresistable Triple Layer Cakes. I think we finally found a bakery quality recipe! It was amazing! Everyone was ranting and raving about it! Perfect structure, texture, moistness, and flavor! Not a single complaint about this recipe! This is the second absolutely delicious recipe that we have gotten from this cookbook. I currently just have the cookbook checked out from the library, but I think it is time for this one to become a permanent part of the sweet escape library!
Labels:
Cake
Saturday, January 15, 2011
Ladybug Cupcakes!
Had to challenge ourselves with doing three designs! As if working with fondant isn't enough of a challenge itself! It looked so cute though having a variety! Just hope we didn't cause a fight between any of the little girls at the birthday party! "I want that one!" "No, I wanted that one!" "Uh, there aren't anymore of that kind!"
These were chocolate cupcakes with chocolate frosting! And as far as the chocolate cupcake challenge, these were probably about as close as we have gotten to perfection. They had very good structure, texture, and moisture. Just have to figure out a way to make them a little more chocolatey. With the chocolate frosting they were perfect, but if the cupcake was every paired with a frosting other than chocolate the cupcake would be overpowered in an instant. We have one more trick up our sleeve to try. Stay tuned for the results....
Here is the recipe for the chocolate frosting though! It is absolutely delicious!! Yum yum!
Chocolate Frosting
6 tablespoons butter
2 teaspoons vanilla
3 cups powdered sugar
3/4 cup cocoa
1/3 cup milk (I had to add a little bit extra)
Cream butter and vanilla. In a separate bowl, combine powdered sugar and cocoa. Slowly add to creamed mixture. Add milk until the desired consistency is reached.
Monday, January 10, 2011
Baby Shower Cupcakes
We made three dozen of these cupcakes for a baby shower for two co-workers. Angela had a little girl, Abela, and Melissa had a little boy, Evan!
These cupcakes were also almond and lemon flavored!! Worked well to mass produce the two flavors for our orders this weekend!! All of the decorations are made out of marshmallow fondant! I was a little skeptical at first about how these were going to turn out, but dang they sure turned out cute!!!
Labels:
Cupcakes
Sunday, January 9, 2011
The Man Catcher- Sour Cream Pound Cake
I have checked out many, many cookbooks from the library since this marriage thing happened and I am suppose to be all domestic or something. Usually I flip through them only once, read the titles and look at the pictures and am done with them in less than five minutes. And if there are no pictures then I am done in less than a minute. In my opinion, a cookbook is boring and useless without pictures. At least for all of us visual people in the world.
Well this past week I got an email notice from the library saying that a cake cookbook I had requested was finally available for pick-up. I went and got it later that afternoon and quickly flipped through it in the parking lot and was utterly disgusted that there were only about fifteen pictures in the whole two hundred page book. If it hadn't been so darn cold that day I probably would have gotten out of my car and put it right back in the return slot outside the library.
Later that night Zach and I were heading to the gym and on the way out the door I grabbed the cookbook for some reading material while I used the elliptical. Usually I look at the timer on the elliptical about every thirty seconds, but that night twenty five minutes went by before I even thought to look once. I couldn't believe how fast the time flew by. The cookbook had totally sucked me in, despite there being very few pictures.
The very first recipe in the book was "The Man Catcher-Sour Cream Pound Cake." Two things had my attention here "man catcher" and "sour cream." I know I have said it before, but I am convinced that sour cream is the secret ingredient when it comes to cakes and cupcakes. I am willing to try pretty much any cake recipe if it has sour cream included in the ingredient list. I was dying for any possible excuse to make this cake, so when my mom asked me to make my dad's birthday cake this was the one I immediately thought of.
The author didn't lie when she said "no man can resist this cake." Both my dad and Zach were going ga-ga over this cake (my mom, sister, and I loved it too!) It is a dense cake, but is incredibly moist. Definitely does not require a frosting. I wouldn't have even had to put on the glaze. Pretty much just put it on for looks. And the subtle lemon flavor is just right. Not overpowering, but still lets ya know its in there. The cake is perfect served alongside a small scoop of vanilla ice cream!
This cake definitely tasted better than it looks in this picture. I had a bit of difficulty getting it out of the darn pan. Next time I am going to try using a bundt pan instead of a tube pan to make it a little prettier and more presentable.
And I actually ordered this cookbook, All Cakes Considered, online right before starting this blog post! Figured the couple of weeks I get to have it from the library won't be enough time to try all of the other recipes I drooled over.
-Jess
Labels:
Cake
Saturday, January 8, 2011
Card Club Cupcakes
Tonight my parents are hosting card club at their house and my mom asked us to whip up some cupcakes for the event! To fit the theme I told her we could cut out hearts, diamonds, clubs, and spades out of fondant. Super cute and fitting for the event, right? Well it was a good idea until she told me she wanted mini cupcakes and I was unable to find miniature cookie cutters in stores or online. Of course the diamonds were super easy. Hearts and spades a little more challenging. And the clubs a huge thorn in my side. All in all though, they turned out super cute! And it all was worth it when I saw my mom's look of awe. She is always amazed with our fondant creations!
And I am proud to present our two most recent additions to the "go-to recipe list." Lemon and Almond!! Woohoo! The lemon is the same recipe that I used this past fall when I made the lemon cupcakes with raspberry frosting, but somehow managed to forget how perfect these little buggers were! This time I paired them with a lemon cream cheese frosting! Simply took our staple cream cheese recipe and added a little lemon zest and lemon juice and replaced the vanilla with lemon extract.
Michele and I are in love with this almond cupcake recipe!! Like Michele said, it tastes like a spritz cookie! It is a moist and delicate cupcake with a subtle almond flavor! I forget the name of the cookbook that we found this in, but it is one that Michele just picked up at Kohl's for $5!! A cookbook for $5 is almost unheard of!! I think a trip to Kohl's is in store for me later today to pick up a copy for myself!
Almond Cupcakes
1 3/4 cup sour cream
2 sticks unsalted butter, room temperature
1/2 cup vegetable oil
3 1/2 cups flour
1 teaspoon baking soda
1 teaspoon baking powder
2 cups sugar
4 eggs
3 teaspoons almond extract
1 teaspoon vanilla
Preheat oven to 325 degrees.
In a large bowl, cream one cup sour cream, butter, and oil.
In a separate bowl, sift together flour, baking powder, and baking soda. Stir in the sugar.
Add the dry ingredients to the creamed butter mixture one-third at a time. Mix thoroughly after each addition.
In another bowl, mix the eggs, 3/4 cup sour cream, almond extract, and vanilla. Add the egg mixture to the batter in thirds, beating for one minute after each addition.
Fill liners 3/4 full. Bake for 25 minutes for regular size cupcakes or 17 minutes for mini cupcakes.
Sure nice to follow up a failed cupcake attempt with two successes!!
-Jess
Labels:
Cupcakes
Tuesday, January 4, 2011
The Journey To Find The Ultimate Chocolate Cupcakes
Michele and I have been doing this whole "baking thing" for about six months now! And in that time we have only found a few absolute, without a doubt, go to cupcake recipes! The pumpkin and strawberry are about the only ones. At least we have two! But we still have a long ways to go with many, many more flavors to tackle. At this point chocolate and vanilla are our main culprits. With these two being the most common flavors that people want to order, there is a little more pressure to find that one amazing recipe.
For the past few months we have been focusing on chocolate. Between the two of us we have tried countless chocolate cupcake recipes. We have had a few failures, a few so-so, and a few that are do-able. It seems like there is always one part that just isn't quite up to par. Usually the downfalls are either not chocolaty enough or doesn't rise into a nice dome. And the most frustrating part is that the recipes we have tried have usually been deemed "the best chocolate cupcake." Not sure if we just have too high of standards or what the deal is.
Today I tried a chocolate cupcake that I found on Pink Parsley. It caught my eye last week when it was listed on the site as one of the most popular posts of 2010. I clicked on the link and the very first words were, "Not to be dramatic, but the search is over. These are quite possibly the most perfect cupcakes ever." And to top it all off it is a recipe from Cook's Illustrated!! A very reputable source.
Well here they are....
And the verdict is: Not overly impressed. They were a little dry, not chocolaty enough, and just didn't have that "wow factor." What a let down.
The journey continues. Dang it. I am so ready to move onto a new flavor, like pina colada or margarita or something a little more fun and exciting.
Luckily I have found another chocolate cupcake recipe that I want to try. It is from Barefoot Contessa, who I absolutely love! And the source that I found them on gave them 4.5/5 stars. Oh please let these be the magic ones.
Saltine Toffee
A couple of weeks ago I came across this recipe twice in one day. Really. Twice in one day. Seemed a little weird. Not like it is some plain-jane chocolate chip or peanut butter cookie. Apparently I am a little out of the loop and missed all the hub-bub about this tasty little treat.
I first saw it sitting on my sister's counter top while I was at her house watching Brodi. And of course, being the obsessive recipe collector that I am, I grabbed a note card and wrote it down immediately. And then later that night stumbled upon it again on Cookies and Cups.
So today I decided to finally see what the hype surrounding this recipe was all about.
Mmm-mmm! Salty. Sweet. Buttery. And. Chocolaty. And the best part is, you get the toffee taste without it sticking in your teeth! That is the one reason why I avoid toffee. Nothing like digging it out of your back molars while visiting with family and friends. No more worries about that one!
Saltine Toffee
35-40 saltine crackers
2 sticks of butter
1 cup brown sugar
2 cups semi-sweet chocolate chips
chopped walnuts to garnish
Preheat oven to 400 degrees. Line a cookie sheet with aluminum foil. Place saltine crackers in a single layer on cookie sheet.
In a saucepan, bring butter and brown sugar to a boil. Boil for three minutes without stirring. Immediately pour over saltines and spread to cover crackers completely.
Bake at 400 degrees for seven minutes. Remove from the oven and sprinkle chocolate chips over the top. Let sit for three or four minutes and then evenly spread melted chocolate over crackers. Sprinkle with chopped walnuts.
Place in the refrigerator until completely cooled. Break or cut into pieces.
Sunday, January 2, 2011
Peanut Butter Snickers Suprise Cookies
The only downfall about these cookies is the numerous steps it takes to reach the finished product. Unwrap miniature snickers, shape dough around snickers, bake, cool, sprinkle with powdered sugar, and drizzle with chocolate. Whew! That is the exact reason why we make these at our annual mother-daughter baking day while the guys are gone hunting. Definitely need three of us working on these. Especially because we triple the batch and make over a hundred.
2 sticks butter, softened
1 cup creamy peanut butter
1 cup light brown sugar
1 cup sugar
2 eggs
1 teaspoon vanilla
3 ½ cups all purpose flour
1 teaspoon baking soda
½ teaspoon salt
1 pkg (13 ounces) miniature Snickers
1 pkg Dove milk chocolates, melted
1 cup light brown sugar
1 cup sugar
2 eggs
1 teaspoon vanilla
3 ½ cups all purpose flour
1 teaspoon baking soda
½ teaspoon salt
1 pkg (13 ounces) miniature Snickers
1 pkg Dove milk chocolates, melted
Combine butter, peanut butter, and sugars using a mixer on meadium speed until light and fluffy. Slowly add eggs and vanilla until thoroughly combined. Mix in flour, salt, and baking soda. Cover and chill dough for 2-3 hours.
Unwrap all of the miniature snickers. Take approximately one tablespoon of dough and flatten in the palm of your hand. Place a snickers in the middle of the dough and form the dough into a ball around the snickers. Place on a greased cookie sheet and bake at 325 degrees for 10-12 minutes.
After cookies have cooled, sprinkle with powdered sugar (works well to use a fine mesh sieve) and drizzle with melted dove chocolates.
Labels:
Cookies,
Peanut Butter
Subscribe to:
Posts (Atom)