Showing posts with label Cake. Show all posts

Sunday, September 18, 2011

Beer Mug Cake


The 21st birthday cake I made for my brother!! It was super easy! Just baked a 9x13 cake and rounded the top edges a little!

Sunday, August 28, 2011

Easy Chocolate Zucchini Cake


If you love chocolate cake, you must try this recipe. If you don't love chocolate cake, this recipe may just have you changing your mind. No lie. I tried this recipe a few years ago and bring it out ever summer when my garden starts to produce an abundance of zucchini. It is so moist and delicious.


1/2 cup butter, softened

4 eggs

1 tsp vanilla

1/4 tsp almond extract

1 cup sour cream

1 chocolate fudge cake mix with pudding in the box, approx 18.25oz.

1/2 tsp ground cinnamon

1 medium zucchini, about 1.5 cups shredded

1 cup semi-sweet chocolate chips

1 cup chopped pecans or walnuts


Grease and flour a 12 cup Bundt cake pan. Heat oven to 325 degrees.


With an electric mixer, beat the butter until light; beat in eggs and flavorings. Beat in the sour cream and cinnamon; then slowly beat in the cake mix. Stir in the zucchini, chocolate chips, and pecans.


Spoon the batter into the prepared pan and bake 40-50 minutes, or until a toothpick inserted in the center of the cake comes out clean. Cool on a rack for 15 minutes. Invert the cake onto a serving plate to cool completely. Frost the cake or dust with powered sugar.


I add a whole bag of chocolate chips and omit the nuts when I bake this cake. I drizzle a few ounces of melted chocolate over the cake after it has cooled. Mmmm, good.


Bake on!

M

Tuesday, August 9, 2011

Miami Heat Cake

This cake was made for my nephew's 13th birthday party. He requested a Lebron James jersey from the Miami Heat. I created the cake using a cookie sheet as my baking pan. I made 2 cakes using the cookie sheet and filled the chocolate cakes with an oreo filling. I cut out the neckline of the cake and then covered it in white frondant. I have to give my husband credit for creating a template of the letters and number for me which I then cut out of red fondant. I traced the edges of the letters using a black edible marker. My husband also created the NBA logo found in the upper left hand corner of the jersey. He took a white piece of fondant and drew it freehand using the edible markers. I think the birthday boy was quite pleased.
Bake on!
Michele

Aargh, Matey!

This pirate cake was created for my nephew's 5th birthday party. I used 2 eight inch cakes layered with filling to create the pirate's face. I covered the whole thing in a flesh tone fondant and then added the accessory pieces. What a success!


Bake on!

Michele

Bridal Shower Tea Party Hat Cake


This hat cake was made for a bridal shower tea party. All attendees of the bridal shower wore a tea party hat. We constructed this cake using 1-10 inch cake as the base or brim and 2 layered 8-inch cakes. We fondanted the cakes separately using the brown ribbon to hide the seam. We achieved the brim my extending the fondant beyond the 10 inch cake instead of trimming it at the edge of the cake. We added the daisy, feathers, and pearls for accessories. Though they aren't edible, they did add a nice finishing touch.

Wednesday, July 6, 2011

Flag Cake

Made this patriotic cake for my super-duper cute goddaughter's baptism. I know, not the usual cake for a baptism, but it seemed kind of fitting being it was the day before the fourth of July. I had intentions of decorating the outside cuter but was frightened with the thought of it getting ruined in the heat and drive to the cabin. Caught everyone by surprise though when the first piece was cut!

And I was dying to try this design after I saw it pinterest (my new obsession!) And being the impatient person that I am, I just couldn't keep this one on the back burner until next year!


And here is the trick to all of the madness. Make a double batch of your favorite white cake recipe. Color the first batch red and divide it into two cake pans. With the second batch and divide it in half. Leave one half white and color the second half blue. When completed you will have two red cakes, one white, and one blue.

After they have cooled. Using a serrated knife or cake leveler, cut the two red cakes and one white horizontally in half. On your cake plate, start by place one of the red halves. Spread the top with a little bit of white filling. Then place one of the white layers on top and spread the top with white filling. And finally, put the red layer on top and spread with filling.

Now for the fun and clever part! Take the blue layer and cut a circle in the middle. I used a ten inch cake pan and cut a six inch circle in the middle. Works well to use a bowl or cake pan as a template. You can now indulge and eat the blue six inch circle if you wish!! Then take the remaining white layer and one of the red layers and stack them together. Using the same bowl or cake pan template, cut circles in the red and white layers. And again you can indulge in the outside rings of red and white cake!

And for the final assembly steps! Place the blue outside ring on top. Put the white circle in the middle first. Top with filling and then place the red circle on top! I highly suggest doing a crumb coat! And then frost and decorate as desired!!

Sunday, April 10, 2011

Lovebirds Cake

This is the cake that I made for my cousin's bridal shower this past weekend! I stumbled upon this cake about a week ago and knew I had to make it for her. Super cute and very fitting! But as you can I see I went with a simpler version and left out the grass and flowers. Sometimes less is more!

I was amazed at how easy this cake actually was to make! Not a single glitch or rough spot in the process. I think that fondant and I have finally worked out our differences and have becomes friends after all! Only took nine months!

And here is the beautiful bride-to-be with her cake!

Saturday, April 2, 2011

Hunting Themed Groom's Dinner Cake

Before I get on with the actual cake, I would like to gloat for a second about the huge challenge Michele and I have finally mastered! We have always had difficulties fondanting a round cake. No matter how hard we tried we always ended up with a skirting effect around the bottom of the cake! We cringed at the thought of fondanting this cake and thought we were setting ourselves up for a disaster, but low and behold, something clicked for us this time around! We placed the fondant over the cake and set out to work on our opposite sides. Within a minute we looked at each other and we both said "my side is totally smooth!!" We did it! Finally conquered the fondant!! Prior to this cake we had said we were never going to fondant a round cake again, but now that we have finally gotten the hang of it, we already have plans for two upcoming cakes!

And now for the actual cake!! The bride surprised the groom with this cake for the groom's dinner! He has a love for hunting and wanted us to do something along those lines. This is what we came up with...

Now imagine a very large fondant "J" in front of the pheasant feathers. I didn't get a picture with that on because I didn't want to put it on before transportation.

These deer antlers caused us some issues, but added so much to the finished product! Definitely my favorite part of the whole cake!

Also wish I could have gotten a picture of the inside of this cake. Better yet, wish I could have actually eaten a piece of it! We did a vanilla buttermilk cake with a berry white chocolate mousse filling and covered with white chocolate buttercream frosting! All of the individual components of the cake were delicious, so I can only imagine how amazing they tasted together!

Sure hope the groom loved his special cake!!

Thursday, March 3, 2011

Maple Cake

First of all, do not judge this cake based on the pictures. It tastes far, far better than the pictures depict. The lighting was poor and long story short, I need a DSLR camera! Hopefully I will be getting one soon. But soon can't come soon enough!


By the time I got around to taking this picture my co-workers had already gone to town and eaten all but this tiny little sliver. If I had waited another ten minutes the cake would have been gone. And this picture wouldn't exist (which wouldn't be a huge loss given its poor quality.)

When I took the cover off of this cake it smelt like a stack of pancakes drenched in maple syrup! So if dessert actually smells like something you would eat for breakfast, does that warrant being able to eat cake for breakfast? Proud to say it wouldn't be the first time for me! Whenever my mom made red velvet cake, my siblings and I would eat a piece for breakfast, lunch, and supper. We always had to make sure we had more than the other two!

The taste, texture, and moistness of this cake was spot on! Wouldn't change a thing! I love finding recipes that don't need any altering. Especially since baking is kind of a science and I'm still not very confident in adding and subtracting ingredients. Would much rather just follow a recipe to a "T."

The next time, yes there will be a next time, I make this cake I plan on making a batch and a half of the frosting. As you can see from the picture, the amount of frosting between the cake layers was scant. Not enough for my liking at least.


Maple Cake with Cream Cheese Frosting

for the cake:
2 3/4 cups all-purpose flour
1 1/2 teaspoons baking powder
1 1/2 teaspoons baking soda
1 teaspoon salt
1 teaspoon cinnamon
1/2 teaspoon nutmeg
3/4 cup unsalted butter, room temperature
1 cup granulated sugar
1/2 cup maple syrup
3 eggs
1/2 teaspoon maple flavoring
1 cup buttermilk

for the frosting:
8 ounces cream cheese, room temperature
3/4 cup unsalted butter, room temperature
3 cups powdered sugar
1 teaspoon maple flavoring


Preheat oven to 325 degrees. Generously grease and flour three nine inch round cake pans.

To prepare the cake, sift flour, baking powder, baking soda, salt, cinnamon, and nutmeg into a medium bowl. Using a mixer, beat butter and sugar until light and fluffy. Add maple syrup and beat until smooth. Add eggs one at a time, beating well after each addition. Add flour mixture alternately with buttermilk, beginning and ending with the flour mixture. Add maple flavoring. Divide batter equally between pans.

Bake 25 to 30 minutes. Let cool in pans on a wire rack for 20 minutes. Invert onto racks and let cool completely.

To prepare the frosting, beat cream cheese and butter with a mixer on medium speed. Add powdered sugar. Mix in maple flavoring. Beat until smooth.

Sunday, February 27, 2011

Streusel Loaded Coffee Cake

I tend to be drawn to anything with a streusel topping! Whether it be muffins, cobblers, crisps, or coffee cake! Pretty much a guarantee that I will like it if there is streusel topping. And it is likely that I will snatch the piece with the most topping! No need to skimp on such a good thing. Everything is better with a little added sugar on top, right?


As soon as I read that this recipe not only had streusel on the top, but also in the middle (kind of hard to see in the picture), I had to make it! Two layers of cinnamon and sugar goodness! The original recipe had a cup of almonds mixed in the streusel topping,but I just wasn't feeling the nuts today. So I used the streusel topping mix from my mom's recipe for coffee cake. And I just happened to have a little extra cream cheese frosting in the fridge that I drizzled over the top!

This recipe is also from the All Cakes Considered cookbook. The same cookbook where I found the recipes for Chocolate Pound Cake and Sour Cream Pound Cake. I have loved all three these recipes! And there are many more cakes in this book that I want to try!

Cinnamon Almond Coffee Cake

For the cake:
1/4 cup shortening
1 cup sugar
2 large eggs
1 1/2 cups all-purpose flour
4 teaspoons baking powder
1/2 cup vanilla yogurt
1 teaspoon almond extract

For the streusel:
2/3 cup sugar
2 tablespoons flour
2 teaspoons cinnamon
3 tablespoons butter

For the streusel, mix together sugar, flour, and cinnamon. Using a fork cut in the butter until mixed throughout.

Preheat oven to 350 degrees. Spray the sides and bottom of an 8 inch square baking pan with cooking spray.

With an electric mixer on medium speed, cream shortening and gradually add the sugar. Add the eggs one at a time, beating well after each addition.

In a separate bowl, dry whisk the flour and baking powder together.

Add a third of the flour mixture to the creamed mixture. Then add 1/4 cup of the yogurt. Repeat once more. And finish by adding the final third of the flour mixture.

Stir in almond extract and beat until well combined.

Spread half of the batter in the prepared pan. Sprinkle half of the streusel topping over the batter. Layer the rest of the batter over the streusel. Sprinkle the remaining streusel over the top.

Bake for 35-40 minutes or until a toothpick inserted in the middle of the cake comes out clean.

ZEBRA!

Today is my Mom's birthday. Happy Birthday Mom! Yesterday the family got together to celebrate her birthday. She requested a chocolate cherry cake; not to be confused with black forest cake. I went to a copy of my Grandma's handwritten cookbook to find the recipe. After searching and searching for it and coming up empty, I called my Mom only to find out that this
cake was called "Cherry Fudge Bars" so I completely passed it during my search. Upon closer inspection, my Grandma does have "cake" written in the margin. I also found a note that this was from a Pillsbury Bake Off. Not sure when though. I adapted this recipe so that I was able to cover it in fondant and create the zebra affect. Ever since my parents went to Africa she has been a little zebra crazy. I'll explain my adaptations after the recipe. This one is so easy. You'll love it!

1 box Pillsbury Fudge Cake mix
1 can cherry pie filling
2 eggs, beaten
1 tsp almond flavoring
Mix the ingredients together. Bake in a 9x13 pan or on a cookie sheet (to make into bars) at 350 degrees for 35-45 minutes for the cake and 20-30 minutes for the bars.

Frosting:
1 cup sugar
5 Tbsp butter
1/3 cup milk
1 cup chocolate chips
1 tsp vanilla

Boil the sugar, butter and milk for 1 minute. Stir in the chocolate chips and vanilla until dissolved. Spread immediately.

Easy peasy, right? Instead of baking it in a 9x13 pan, I split the batter between 2 8-inch round cake pans. I baked them for about 40 minutes or so. Clearly the stove top frosting for this cake wasn't going to work on a round cake but I wanted to include the recipe in its fullness. Jess made a whipped ganache filling that was spread between the layers. The cake was then frosted with a chocolate frosting, previously seen on our ladybug cupcakes. The cherry pie filling in the cake makes it so moist and delicious. It was a hit, though my 4 year old nephew did quite see how the striped cake was a zebra. I'm sure he was expecting the full sculpted body. :) It didn't stop him from eating 2 pieces though.

Jess and I covered this cake in white marshmallow fondant. Then we rolled out fondant dyed black and cut out the stripes. We had no particular plan when it came to covering this cake and attempting to make it look like a zebra. Not too shabby if I do say so myself.
Bake on!
Michele

Monday, February 21, 2011

"Protect the Cake"


Happy Birthday to my friend and co-blogger, Jess. So of course I made her a cake. I took the opportunity to try a new recipe. I found this recipe in the book Baked Explorations which I had picked up at my local library. While this book is full of some very enticing recipes, I opted to make the "Caramel Apple Cake". While the author writes that he "never made it before August or after January", I broke the little "rule" and went for it. I love the typical flavors of fall....apple and pumpkin...so much so that they can't be limited to fall alone. I know Jess and I share this way of thinking so I knew that she would up for an apple cake. Interestingly enough, Jess was just telling me over lunch today that she was looking for a new pumpkin recipe to try. Great minds think alike. Anyway, on to this delicious cake. This three layer cake is moist, dense and delicious. The caramel buttercream is light and very complimentary to the spiced cake.

For the apple cake:
4 cups all-purpose flour
2 tsp baking soda
1 tsp baking powder
1 tsp salt
3 tsp cinnamon
1 tsp ground allspice
1 tsp ground cloves
1 1/2 cups unsalted butter, cut into 1 inch cubes, at room temperature
2 1/2 cups sugar
2 large eggs
4 cups homemade applesauce or store-bought unsweetened applesauce.

Preheat the oven to 325 degrees F. Butter three 8 inch round cake pans, line the bottoms with parchment paper, and butter the parchment. dust the parchment with flour and knock out the excess flour.

Sift the flour, baking soda, baking powder, salt, cinnamon, allspice, and cloves together into a large bowl. Set aside.

In the bowl of a standing mixer with the paddle attachment, beat the butter until creamy, about 4 minutes. Add the sugar and beat until light and fluffy, about 3 minutes. Add the egg and beat until combined.

Add the flour mixture to the mixer bowl in three parts, alternating with the applesauce, beginning and ending with the flour mixture. Scrape down the bowl, then mix on low speed for a few more seconds.

Divide the batter among the prepared pans and smooth the tops. Bake for 40-45 minutes, rotating the pans halfway through the baking time, until a toothpick inserted in the center of the cake come out clean. Transfer the pans to a wire rack and cool for 20 minutes. Turn the cakes out onto the rack, remove the parchment, and let cool completely.
Now, on to the good stuff the "Classic Caramel Sauce". I would make this next so that it has ample time to cool before you make the buttercream.

1 1/2 cups sugar
1/4 cups corn syrup
1/2 cup of butter, softened, cut into 1/2 inch cubes
1 1/2 cups heavy cream
In a medium saucepan with high sides, combine the sugar and corn syrup with 1/2 cup water. Stir the mixture gently so you don't slosh any of it up the sides of the pan. Turn the heat to medium-high and continue stirring until the sugar dissolves. Increase heat to high, stop stirring, and allow the mixture to boil. Once it begins to turn a rich caramel color, remove it from the heat, add the butter and cream, and stir until combined.


This caramel sauce turned out to be the most challenging task for me. It took me 4, yes 4, attempts at getting this right.

1. I followed the recipe as written. The sugar mixture wasn't turning caramel colored so I assumed that maybe I was supposed to use brown sugar instead of white sugar.

2. Then I made the recipe using brown sugar. Immediately after mixing the ingredients I realized that this wasn't right either.

3. I reverted back to white sugar and watched the mixture turn to a golden yellow. I took my eyes off of it for 30 seconds to a minute and by then the mixture was a dark caramel color and I had burnt it.
4. Success. Note to self and to all of you, watch it carefully.

Alright, now on to the buttercream.

1 1/2 cups sugar
1/3 cup all-purpose flour
1 1/2 cups whole milk
1/3 cup heavy cream
1 1/2 cups unsalted butter, soft but cool, cut into small pieces
1 tsp vanilla extract
1/3 cup plus 2 tablespoons Classic Caramel Sauce

In a medium, heavy-bottomed saucepan, whisk the sugar and flour together. Add the milk and cream and cook over medium heat, whisking occasionally, until the mixture comes to a boil and has thickened, about 10 to 15 minutes.

Transfer the mixture to the bowl of a standing mixer fitted with the paddle attachment. Beat on high speed until cool. Reduce the speed to low and add the butter and vanilla; mix until thoroughly incorporated. Increase the speed to medium-high and beat until the frosting is light and fluffy.

Add 1/3 cups of the caramel and continue mixing until combined. If the frosting is too soft, put the bowl in the refrigerator to chill slightly, then beat again until it is proper consistency. If the frosting is too firm, set the bowl over a pot of simmering water and beat with a wooden spoon until it is the proper consistency.

Layer and frost the cake. Drizzle with swirls of caramel.

Everyone at work thoroughly enjoyed this cake. I immediately had requests for the recipe. Here is the greatest part of it all...Jess and I work as RNs at the local hospital. Security made an overhead announcement for a red alert aka fire drill/alarm... Jess put it best when she said "protect the cake". Guess it must have been good. :)

Bake on!
Michele

Sunday, February 20, 2011

Happy 30th Birthday Brian

This cake was made for my friend Katie's fiance, Brian. Brian turned 30 this year so he needed a cool cake. My first instinct was to make him a round cake with the Wild logo on it- Minnesota's professional hockey team. Katie had arranged a surprise party for Brian. Let me start over, the party itself wasn't a surprise, but taking a limo to the Wild game with 11 of his closest friends instead of having a party at their home was. After a long debate, I decided that I didn't want to risk him putting 2 and 2 together and figure out that we were going to the Wild game. So, my next thought was to make him a Coors Light cake as this is his beer of choice and he loves his beer. I was fully dedicated to making him this cake until the night before I was going to start baking, when I decided that it was too big of a project to tackle without Jess here to help. So, my husband and I came up with a third option, a duck hunting cake. Duck hunting is one of Brian's favorite things to do. Perfect! I had an idea. Now to execute. Katie and Brian told me that they had recently had a red velvet cake with white chocolate filling and cream cheese frosting. So, this was my mission. I turned to Yes, Divas Can Cook for a recipe for a red velvet cake. I will admit that it took me all of my 28 years before I tasted red velvet cake. I know. I know. You can gasp here. What makes it challenging then is to know whether you have a good recipe on your hands. I made this recipe into cupcakes and had Jess taste test them for me prior to making this cake. She said that they were moist but that it didn't seem as chocolaty has her Mom's recipe. So, I took this recipe and added one more tablespoon of cocoa powder. It turned out beautifully though the extra tablespoon of cocoa did dull the bright red color a bit.


2 cups all purpose flour
1 tsp baking soda
1 tsp baking powder
1 tsp salt
2 tablespoons unsweetened cocoa powder
2 cups sugar
1 cup vegetable oil
2 eggs
1 cup buttermilk
1 tsp white distilled vinegar
2 tsp vanilla
2-3oz red food coloring
1/2 cup prepared hot plain coffee


1. In a large bowl mix together the flour, baking soda, baking powder, salt, and cocoa powder. Whisk until combined. Set aside.

2. In a separate large bowl, mix the sugar and oil together.

3. Add in eggs, buttermilk, vanilla and red food coloring. Stir until combined.

4. Next add coffee and vinegar. Stir until combined.
5. Pour the flour mixture into the sugar mixture a little at a time, beating until well combined.

6. Pour the batter into two greased and floured 9-inch round cake pans. Bake 30-40 minutes at 325 degrees or until a toothpick inserted in the center comes out clean.

7. Allow the cakes to cool in the pan for 10-15 minutes. Then remove them from the pan and allow them to finish cooling on a wire rack.

I should let you know that I did end up using 3oz of red food coloring. I'm sorry to say that I don't have a picture of the inside of the cake. While it wasn't bright, bright red, it ended up having a solid red color. I was pleased. Now to tackle the filling.

I have never used white chocolate as a filling so I again had to search for a recipe. I ended up finding this recipe for white chocolate frosting. This filling/frosting had such a good rich vanilla chocolaty flavor. It tasted sooooo good. Somewhere along the way, my execution failed however. I'm convinced that the error occurred when the eggs were beating. I'm not sure if a bit of yolk was mixed or what the deal was, but those babies would not whip up. I should have stopped right then and there. I know better than that. For some insane reason I went ahead with the recipe and then ended up with a runny filling. I will likely try to one again, making sure that the egg whites are fluffy before I continue. :)


1 cup sweetened condensed milk
8 Tbsp unsalted butter
8oz white chocolate chips
3 large egg yolks
1 cup confectioners sugar

Hahaha. Okay well at least I can laugh about it now. I was supposed to use egg yolks NOT the whites. Oooops. No wonder it didn't work.


Continuing on...

To make the frosting, heat the sweetened condensed milk, butter and chocolate chips in a saucepan over medium heat. Cook, stirring occasionally, until the chocolate chips melt. Remove from heat and let cool.

In a mixing bowl, beat together the egg yolks and confectioners' sugar with an electric mixer until fluffy.

Add the chocolate mixture and mix until thick.

I spread this between the two 9X13 sheets of red velvet. Then I covered the whole cake with cream cheese frosting. Yum. There were some hiccups along the way, but all in all I think my first red velvet cake turn out pretty well.

Now for the fondant...
So, this the part where my husband became quite involved and boy was I thankful. Not only did he make 2-3 runs to the local grocery store when I ran out of ingredients during the project (do to the frosting failure) but he took the time to create the silhouette scene with me. Him and Brian often go duck hunting together, along with our dog, Jack. This scene perfectly depicts that. Justin was so proud. Together we looked up ducking hunting decals online. He helped me (more like insisted that I) place the ducks in the right position for landing which is when a hunter would shoot at them as shown in the scene. Likely the average person wouldn't have notice this and maybe not even a hunter, but it was so cute seeing him get all involved in one of my projects. So we printed out a bunch of decal images. Justin cut them all out for me and then we taped them together to create the scene. Not to shabby, huh? I laid the paper cut-out on my fondant and went about the tedious task of cut out the silhouette. It all turned out perfectly except my paper stuck a bit to the fondant in a few spots and pulled a bit up when I removed it. It upset a perfectionist like me, but I took a few deep breaths and moved on. For the background, I had covered the cake in white fondant. Then I took a bottle of orange and yellow Wilton Color Mist and created the sunrise scene. I dipped my fingers into a few drips of red food coloring to add a few touches of a deeper color here and there. The few ducks up the top right corner of the cake were drawn by yours truly using a black edible marker.

Brian was utterly surprised when I showed him the cake. Everyone at the party was amazed. I think some even Twittered about it. Ahhh, feels so good. Another sweet success.

Bake on!
-M

Sunday, February 13, 2011

Chocolate Pound Cake


Kind of hard to blog about a cake or recipe when I didn't have the chance to actually taste it. I made this cake for my mom's birthday, but wasn't able to celebrate with her due to working the weekend. Darn work gets in the way of everything fun.

I can however tell you that our house smelled absolutely amazing after baking this cake. Zach said he could smell the chocolate immediately after getting out of his truck.

I told my mom she had to give me a full report of the cake. And these are the phrases she used to describe it: light and fluffy, moist, decadent, and overall just delicious. Love my mom's report, but you know how it is, moms never have a bad thing to say about something their child makes. But she tells me that I have piece waiting for me in the freezer so I can try it this weekend. I will give you the full scoop afterwards!

Chocolate Pound Cake

3 cups all-purpose flour
3 cups sugar
1/2 cup unsweetened cocoa
1 stick unsalted butter
1 cup shortening
1 1/4 cups milk
1/2 teaspoon baking powder
1 teaspoon vanilla
5 large eggs

1. Preheat the oven to 325 degrees. Line the bottom of your pan with parchment paper and spray the sides and bottom with baking spray--I had a decorative bundt pan so I used the Pam Baking spray and skipped the parchment paper.

2. In the bowl of an electric mixer, dry whisk the flour, sugar, and cocoa.

3. Gradually add the butter, shortening, and m ilk. Beat on medium speed until smooth.

4. Add the baking powder and beat until incorporated.

5. Still on medium speed, add the vanilla extract and then add the eggs, one at a time. Beating well after each addition.

6. Pour the batter into the prepared pan and bake for 1 1/2 hours or until a toothpick inserted in the center comes out clean.

7. Cool the cake in the pan for 10 minutes. Level off the top of the cake using a bread knife before flipping the cake out of the pan.

8. After the cake has completely cooled, you can dust with powdered sugar. I chose to drizzle a little ganache over the top. Caramel would be a delicious option as well. Really, the options are endless.

Source: All Cakes Considered by Melissa Gray

Sunday, February 6, 2011

Red Velvet Cake

This cake has "home" written all over it! Love. Love. Love it.

Figured the super bowl was the perfect excuse to bake up a cake. These days I look for any little opportunity to do a little baking. And a red velvet cake it was! Being this will probably be my only chance to bake anything red velvet before Valentine's Day.


The recipe is the same one that I used in the Red Velvet Cupcakes. This time I only had about an ounce and a half of red food coloring and it was still vibrant. I think using one ounce would probably still be efficient. I baked the cake in two eight inch cake pans for about 25 minutes. And used our classic cream cheese recipe to fill and frost the cake.

Wednesday, February 2, 2011

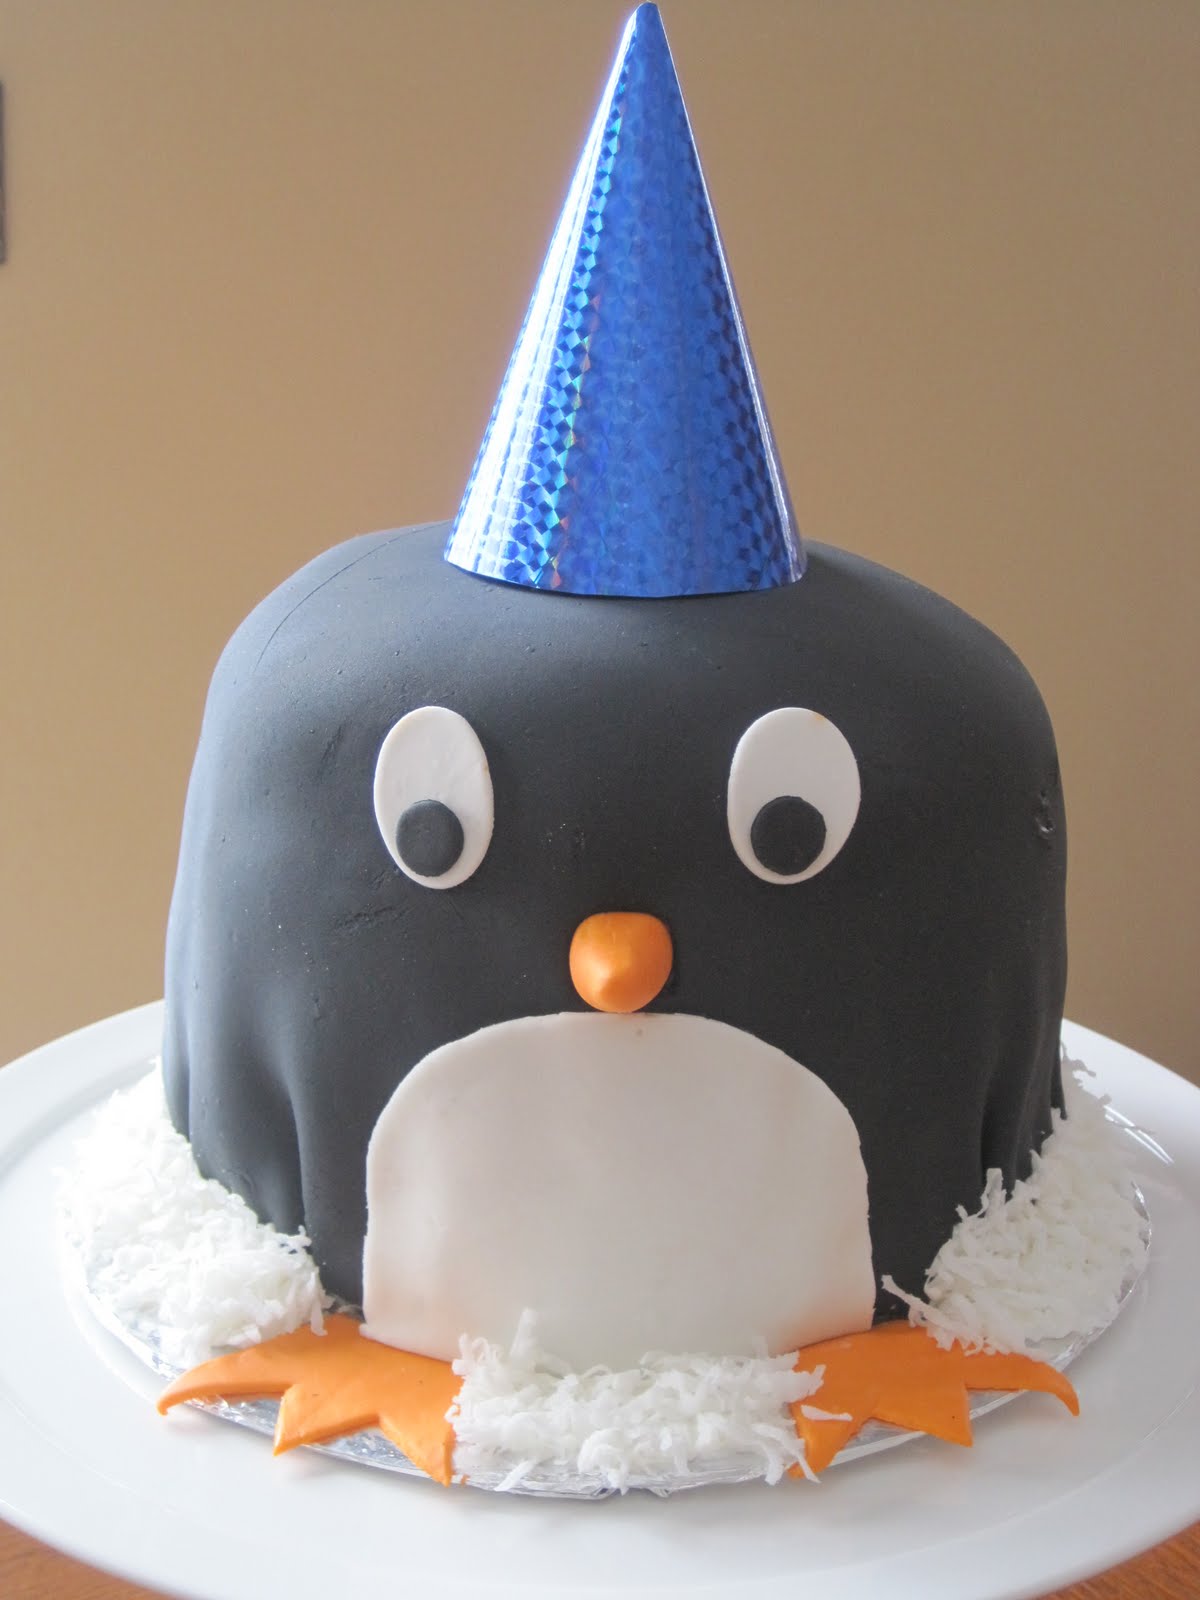
Penguin Cake

Boy was I fooled! I thought this cake was going to be easy peasy. Turns out it was probably one of our most frustrating cakes to date. I saw this super-duper cute penguin cake last Friday when I was browsing through the links on I'm Loving it Fridays. And instantly I wanted to make it. Immediately bookmarked the link on my computer and started racking my brain to try and think of any upcoming events that we could make it for.

Even though penguins have absolutely nothing to do with my grandma, we decided to make this cake for her birthday! Zach and I were heading over to her house on Sunday to celebrate her birthday and I had already planned on making her a birthday cake. But it was just going to be a boring throw-it-in-a-9x13-pan type of cake. I know, pretty lame huh? That's why we figured we might as well take it up a notch and add some fondanty goodness to make it all cute and stuff!

Started with just three layers of eight inch banana cake, but soon realized that it was going turn into one short and fat penguin. Ended up making another batch of cake and adding a fourth layer to the top! This was one tall cake! Filled and frosted the cake with cream cheese frosting. Holy yum!

Now for the fun part, or in our case not so fun part, covering the cake with fondant. I think we have covered about four or five round cakes with fondant now and every single time we end up with a nice smooth top but a skirting effect around the bottom. As we smooth our way down the cake we reach a point where the extra fondant starts bunching up and creates a ruffled look. This time we were able to cover up part of our imperfections by adding a little coconut around the bottom of the cake to look like snow. But we seriously need to figure this out. There has got to be some kind of trick that we are missing out on....

Anyways, here is our little guy. Ruffled look and all.

The eyes, nose, tummy, and feet are all made out of fondant as well. Cutting this stuff out was the easy part!

My grandma loved him! And that is all that matters! Don't ya love how grandparents look past the imperfections! I was telling her about our fondant difficulties and her response was "I would have never even noticed!"

Yum, yum, yum! Everyone said it tasted like frosted banana bread! But the cake was definitely more moist that the typical banana bread.

Banana Cake
adapted from recipezaar

Ingredients
1 1/2 cups bananas, mashed, ripe
2 teaspoons lemon juice
3 cups flour
1 1/2 teaspoons baking soda
1/4 teaspoon salt
3/4 cup butter, softened
2 1/8 cups sugar
3 large eggs
2 teaspoons vanilla
1 1/2 cups buttermilk

Directions
1. Preheat oven to 300°. Grease and flour three round eight inch cake pans. I also cut out a piece of parchment paper to place in the bottom of the pan.
2. In a small bowl, mix mashed banana with the lemon juice; set aside.
3. In a medium bowl, mix flour, baking soda and salt; set aside.
4. In a large bowl, cream 3/4 cup butter and 2 1/8 cups sugar until light and fluffy. Beat in eggs, one at a time, then stir in 2 tsp vanilla.
5.Beat in the flour mixture alternately with the buttermilk. Stir in banana mixture. I also added in a sprinkle of cinnamon.
6. Divide batter among prepared pans (about 2 1/2 cups per pan) and bake in preheated oven for about fourty-five to fifty minutes or until toothpick inserted in center comes out clean.

7. Let cake cool for about ten minutes and then remove from pan and immediately wrap in saran wrap. This will help keep the cake moist.

Sunday, January 23, 2011

M-I-C-K-E-Y M-O-U-S-E


This Mickey Mouse cake was made for my nephew Luke's 2nd birthday. Luke is a big fan of Mickey. He is also a big fan of Buzz Lightyear so I'm just glad my sister went with the Mickey theme for his birthday. I can't imagine putting together a Buzz cake. Don't' get me wrong. I would've accepted that challenge.
My husband and I just got home from his birthday party. Oh it was so much fun. I just have to say that I went in full spirit with my Minnie Mouse shirt on. Luke saw his cake got the cutest little smile on his face and kept saying over and over, "Mickey cake!" while gave Mickey a little pat on the cheek. Thank goodness fondant can maintain the integrity of the cake. I wish I had a picture of him and his cake. I'm sure my sister does. Too darn cute. I asked his older brother Rhett what he wanted for his birthday thinking that he might have changed his mind, but he hasn't. He still wants a repeat of his last birthday cake... a Nemo cake which can be seen in an earlier blog post. Of course at the end of the night I turned to my sister and brother-in-law and asked what the theme is for their next son, Owen's birthday who will turn 1 in June. I just love those three little boys.
I'm so sad to say that I didn't have Jess helping me on this project. I really missed not baking and assembling with her. I really could have used her help. In the end the project turned out quite well. Someone even told my sister at the party that I should start selling them. At that time my sister informed her that I (we) do!
To make the Mickey cake I made one 10 inch cake and two 6 inch cakes. I cheated just a little and made the ears from 2 boxes of vanilla cake mixes and store bought frosting. The 10 inch cake was homemade. I used the chocolate cake recipe from the chocolate cake with PB frosting that Jess blogged about in an earlier post. This chocolate cake is so moist and delicious. The only problem is that it is so moist and delicate that it can be challenging for a novice to assemble a layer cake using this recipe. For the filling on all of the cakes I made whipped ganache and to it I added finely crushed mint oreos. I covered the chocolate cake with a really delicious chocolate frosting. I will blog about the frosting in an upcoming post. It sure was a find!
Everyone loved the taste! I got many compliments on the great moistness of the chocolate cake. While people could tell that the filling was mint they couldn't quite put their finger on what it was. The combination of the mint oreos and the whipped ganache made a really yummy filling. It certainly helped jazz up the plain boring boxed vanilla cakes.
Another Sweet Escape success.
Bake on!
-M

Sunday, January 16, 2011

Alien Cake

About a month ago Michele and I were talking about how her nephew wants a mickey mouse cake for his birthday at the end of January. Zach happened to be in the room during this conversation and immediately said "what kind of cake do I get for my birthday?" After a few seconds of pondering he blurted out "I want an alien cake!" And he was totally serious. He had his heart set. His only criteria was to make it cartoon-like versus sci-fi. When asked what he wanted it to look like his response was "let your creative juices flow!"

And this is what we came up with!

Clearly the birthday boy liked it! The inner kid never dies!

And this vanilla cake was phenomenal! It is a vanilla buttermilk cake from Sky High: Irresistable Triple Layer Cakes. I think we finally found a bakery quality recipe! It was amazing! Everyone was ranting and raving about it! Perfect structure, texture, moistness, and flavor! Not a single complaint about this recipe! This is the second absolutely delicious recipe that we have gotten from this cookbook. I currently just have the cookbook checked out from the library, but I think it is time for this one to become a permanent part of the sweet escape library!